
Every programmer dreads the phrase: “But it works on my machine!!!” Our poor developer now knows that he must now figure out what’s wrong among a bazillion things. “Okay, so what’s your OS? I hope there’s not a quirk with the OS. What about your node version? Maybe the app only works with this specific node version. Etc…”
Just thinking about it wakes up my problem-solving PTSD developed from many wasted hours trying to figure out what’s wrong with a setup.
And that’s where Docker comes in. Docker sets a common environment that never changes for us to run our app into. If it works on my machine with the Docker image… it will work on yours!
In this tutorial, we’ll create a simple create-react-application and then we’ll run it in a Docker Container.
Container? Image? Are you confused? You’re at the right place because this tutorial is for newbz with a z at the end.
Let’s get started.
Docker Image vs Docker Container
Just to clarify this real quick. A docker container is an instance of a docker image. In the same manner that a built house (container) is an instance of the architect’s plans (image).
Simple, right?
NEXT!
Making our First Image
I just want to say that in this tutorial I am assuming you have everything installed already. You should have Node.js, create-react-app and Docker. You’re a big boy. I know you can do that without me. Install all that and come back.
So to start, we’ll create a simple React application.
npx create-react-app my-app
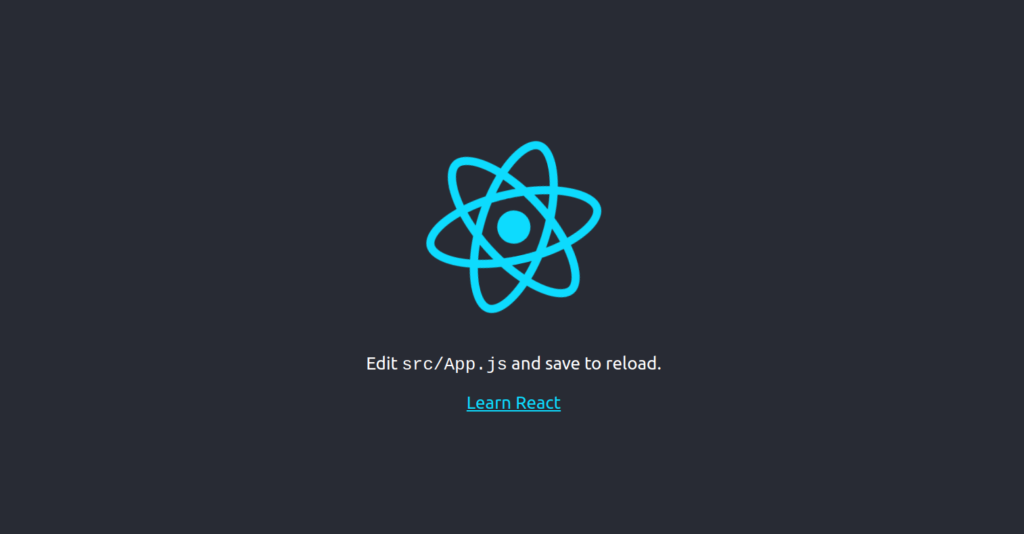
cd my-appCool now we got a React application. Our goal with this tutorial will be to run “npm run start” and then see our web page while it runs in the container.
Now, we want to create a Docker Image. How do we do that? We must specify instructions to give to Docker on how to build the image. This is done in a Dockerfile.
Create an empty file inside the React application and call it “Dockerfile”.
Now, let’s fill that Dockerfile. The comment on top of the line will explain what it does
# This is the base image. In this case, we are taking a Linux image with node 11. This image is pulled from Docker Hub. https://hub.docker.com/_/node/
FROM node:11

# This will be the directory in which commands such as COPY and RUN will be run.
WORKDIR /app

#This means we copy everything in the current folder (our React application) into the folder defined previously in WORKDIR
COPY . .

# RUN means we run commands in the command line during build time. In this case, we have npm, because it is included in the base docker image. If we didn't have it, we'd have to use RUN to run commands to install node.
RUN npm install

# CMD defines a run-time operation. In this case we want to start the webserver
CMD ["npm", "run", "start"]
Did we make a mistake while creating our Dockerfile? Let’s try building our image!
docker build . -t my-appThe command above builds the image from the content of the Dockerfile (since I am assuming the current directory is the one containing the app). The argument “-t my-app” means we want to give our image the tag “my-app”, which will let us refer to our image more easily. After letting the build run, the command line shows:
Successfully built 82322ef0e172
Successfully tagged my-app:latest
That means success! “82322ef0e172” is the image id and “my-app” is the tag we defined above in the build command.
Remember the difference between IMAGE and CONTAINER describe above? Right now we have an image, not a container. We got the plans of the house, we just need to build it so our app can live in it!
docker run -dit -p 3000:3000 --name my-app --rm my-appLet’s dissect the command above.
-dit : This will run our container in detached mode running in the background after execution of the commands in the Dockerfile. Without -dit, the container wouldn’t still be running. It would stop as soon as all the commands are run.
-p 3000: 3000 : This maps port 3000 on our local machine to port 3000 on our docker container. 3000 is the port that the create-react-app web server runs on by default.
–name my-app: This is the name we want to give to our container
–rm: This means we wants to delete the container once it has stopped running.
my-app: The name of the image that will serve as basis for the container
Now do:
docker psThis will list all the running containers. You should be able to see a container name my-app alongside other information such as the container id.
The last step is to admire our final result. Go to http://localhost:3000 and you will see your app running!
Have fun!
Docker is an important technology to know about so I hope this was useful to you! Also, here is a github with the react app and dockerfile used in this tutorial: https://github.com/SamueleA/docker-tutorial